Saturday, December 20, 2014

SPIN model checker with iSpin on windows


1. Install supporting Software

Install gcc
Download cygwin setup file from https://cygwin.com/install.html and Install cygwin by double clicking on setup file.

Select gcc-c++ from package list


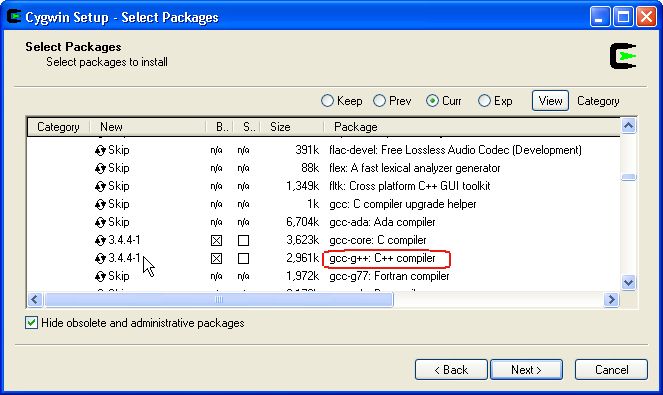
Look here for complete step
Then include 'c:\cygwin\bin' to PATH environment variable (https://www3.ntu.edu.sg/home/ehchua/programming/howto/Cygwin_HowTo.html)

Install TCL/tk software
Download the installation file from here  and install it.
Install graphviz 
Download latest graphviz setup file from here and install it.

2. Spin  and Ispin installation

  • Download spin executable from http://spinroot.com/spin/Src/index.html (select Windows PC executable, iSpin, and documentation, but no sources) and unzip it. It contains executables and examples. 
  • Select appropriate spin exe(include 64 and 32 bit) and rename into spin.exe.  
  • Copy spin.exe and ispin.tcl to "c:\cygwin\bin'( Assume default installation drive is C)
  • Create a shortcut for "c:\cygwin\bin\ispin.tcl".
  • Now you can access spin gui using ispin shortcut.
Known Issues

1.gcc error

Solution
1. Open cygwin-terminal and create link for gcc-3 and gcc-4
cd /bin
ln gcc-3 gcc
ln gcc-4 gcc 

Monday, October 27, 2014

SPIN model checker with iSpin on ubuntu 14.04

Spin is a popular open-source software verification tool, used by thousands of people worldwide. The tool can be used for the formal verification of multi-threaded software applications.[Read More]

1. Download latest source code(Full distribution, with sources) from http://spinroot.com/spin/Src/index.html
2. Install yacc on your system 
sudo apt-get install byacc Tk8.5
3.Unpack the spin source code and compile.
gunzip *.tar.gz
tar -xf *.tar
cd Src*
make
4. If its compiled without error, then copy the executable into your system path. 
sudo cp spin /usr/local/bin
5. Check the correctness of your installation using version command
spin -V
6. Move to iSpin folder in spin source code and install ispin
cd ../iSpin
sudo sh install.sh

Now you can invoke ispin interface using 'ispin' command


Reference 

[1]. http://spinroot.com/spin/Man/README.html

Friday, September 20, 2013

Running a JAR as a service using upstart

It is very simple to run JAR file as a daemon in latest version of linux using upstart script.Instead of creating a script in /etc/init.d, as with System-V init, you create a .conf file in /etc/init folder. Then upstart takes care of running it as a service.

This example for a 'sample' service for a sample.jar located in /usr/local/ folder( you can put jar anywhere in system, but always use absolute path)

Create a sample.conf file in /etc/init in following syntax


description "sample service" 
author "Jinesh" 

start on runlevel [3] 
stop on shutdown 

expect fork 

script 
      java -jar /usr/local/sample.jar
      emit sample_running 
end script 

Then you can start service using

service sample start

and stop using

service sample stop

Thursday, August 1, 2013

MQTT Java Publisher and Subscriber using Eclipse Paho


MQTT is a one of most popular machine-to-machine (M2M) connectivity protocol. It was designed with extremely lightweight that support embedded and low power processing device. MQTT popularly used in samrtphone chat application and sensor communication. You can find more information about MQTT from here. MQTT is broker based message queuing system. It is very to install open Source MQTT server like Mosquitto using a simple apt-get or yum command.

sudo apt-get install mosquitto
Eclipse Paho is one mqtt client work well with mosquitto. The below MQTT subscriber and publisher code based on java eclipse paho library 1.0.1. You can also use public mosquitto server in http://test.mosquitto.org/

MQTT subscriber


MQTT publisher


Complete eclipse project https://bitbucket.org/mkjinesh/mqttclient

Tuesday, April 23, 2013

Gvfs upgrade for MTP support in ubuntu 12.04

Starting with Android 4.0 Ice Cream Sandwich, the OS does not support Mass Storage Device interface for USB data transfer. It use MTP for phone storage access via USB . It cause some difficulty in Ubuntu 12.04/12.10 for browsing and copying via USB. You can mount the SD card and phone storage, but its only display the first level folder. You can't browse the any file inside it because 12.04 and 12.04 shipped without MTP sppport

Upgrade Gvfs for MTP support

1. Add the the langdalepl/gvfs-mtp' PPA to your sytem.
sudo add-apt-repository ppa:langdalepl/gvfs-mtp
sudo apt-get update
2. Lanuch update manger and install all updates from LP-PPA-langdalepl-gvfs-mtp or use 'apt-get upgrade'


3. Restart your system and connect your device. You can mount the SD card and browse the files using ubuntu file browser.

Tuesday, March 26, 2013

Paper Review:- The most dangerous code in the world: validating SSL certificates in non-browser software


Authors: M. Georgiev, S. Iyengar, S. Jana, R. Anubhai, D. Boneh, and V. Shmatikov

SSL is a common standard used by Internet community for secure communication. Now a days SSL provides a critical role in many application like banking, sensitive data transfer etc. The core concepts of of SSL depends on the certificate provided by the server during the initial connection establishment. This paper reveals the security flows in many security critical application and libraries due to the improper use of SSL functions. Many of these vulnerability is due to the badly designed APIs in SSL data transport implementation. Most of SSL implementation APIs expose the low level details to application programmers. The common application developers are unaware of options and other parameters in SSL implementation. These leads to the incorrect use of SSL functionality in the application.
Chain-of-trust verification and Host name verification are the two important steps in SSL handshake. This paper give a detailed analysis on this area based on some commonly used libraries and APIs. OpenSSL and JSSE are the most commonly used libraries for SSL abstraction. But both libraries are only covered certification verification part of SSL handshake. Application programmers are need to implement host name verification part by themselves on their application. The non-standard use of these functionality introduce serious vulnerability in SSL communication. Data transport libraries like cURL and Apache httpclient also use the same libraries to achieve SSL capability. SSL tunels are widely used non-browser environment like Cloud Client API, Merchant payment SDK, Web servicing middle ware etc. These applications are security critical because of the nature of data they are handling . Paper also present a experiment conducted based on the vulnerability found on basic libraries and APIs. They are succeeded to perform man-in the middle attack in many application including Amazone Flexible Paymant Gateway,Lynx,Paypal IPN etc.
These paper tries to convey a warning to application developers and APIs Developers. APIs developers must wrap the basic functionality of underlaying system and application developers must study the APIs functionality and options before using them.

Thursday, March 21, 2013

Install TinyOS 2.1.1 in ubuntu 12.04

TinyOS is a open source operating system for low power wireless device used in sensor networks,person area network, smart meters etc. You can find more information about tinyos from here

These configurations are done for tiny os  2.1.1 for micaz mote

Open /etc/apt/sources.list and add the following line at the end of file.

deb http://tinyos.stanford.edu/tinyos/dists/ubuntu karmic main

Update apt-get and install tinyos

sudo apt-get update
sudo apt-get install tinyos-2.1.1

Change the ownership of tinyos root directory to your user

sudo chown : -R /opt/tinyos-2.1.1/ 

Edit .bashrc in user home and add the following lines at the end

export TOSDIR=$TOSROOT/tos
export CLASSPATH=$TOSROOT/support/sdk/java/tinyos.jar:.$CLASSPATH
export MAKERULES=$TOSROOT/support/make/Makerules
export PATH=/opt/msp430/bin:$PATH
source /opt/tinyos-2.1.1/tinyos.sh

Install the java tools using

sudo tos-install-jni

Install Java docs 

Go to /opt/tinyos-2.1.1/support/sdk/java
make
make install
make javadoc 

Common Errors

1.Unexpected operator during tos-jni-install command

Error

sudo tos-install-jni 
[: 31: =: unexpected operator 

Installing 32-bit Java JNI code in /usr/lib/jvm/java-1.5.0-sun/jre/lib/i386 …

done.

Solution  

Edit /usr/bin/tos-install-jni and change 1st line from “#!/bin/sh” to “#!/bin/bash”

Tuesday, February 12, 2013

Git Clone Error "http://myserver.com/example.git/info/refs not found: did you run git update-server-info on the server?"

I got a simple solution for this issue. 

Problem

1. Git reposiory over http with ldap authentication
2. Repository authentication and listing is work perfect using browser
3. But git clone fails with “http://myserver.com/example.git/info/refs not found: did you run git update-server-info on the server?”

Solution

In the git repository server

1. Go to git repository folder(Here example.git)
2. Create a empty file with name 'git-daemon-export-ok'
[eg: $touch git-daemon-export-ok]

Then try 'git clone http://username@/example.git'

Happy coding ...:)

Wednesday, June 20, 2012

Remove AES Encryption From MIT Kerberos V5

AES encryption is used by default in MIT kerberos v5. But in Cloudera Distribution of Hadoop(CDH) does not support AES encryption.Here I am describing how to remove AES encryption from kerberos and change password of Ticket granting Ticket Principal.

Step 1: Removing AES encryption

Edit /etc/krb5kdc/kdc.conf file and remove aes256-cts:normal from ' 'supported_enctypes'

sudo vi /etc/krb5kdc/kdc.conf 
Step 2: Change password of Ticket granting Ticket Principal 

Use the following command in 'kadmin' utility

#kadmin -p root/admin
>change_password -randkey krbtgt/TEST.COM@TEST.COM
TEST.COM is your realm name.


Step 3: Restart kdc and admin server 
sudo invoke-rc.d krb5-kdc restart
sudo invoke-rc.d krb5-admin-server restart
Reference : http://web.mit.edu/kerberos/www/krb5-1.2/krb5-1.2.6/doc/admin.html

Monday, June 18, 2012

Installation and configuration of MIT Kerberos on Ubuntu

Kerberos is a central authentication protocol used to verify users, hosts and services using kerberos database. Kerberos database contains the entries called principals,which consists of principal names, secret keys, key aging information and Kerberos-specific data. User can access these principal from anywhere in the realm. Each realm contain one Key Distribution center and many slaves.User input is authenticated against the Kerberos database. In successful authentication, the KDC ("Key Distribution Center") will issue users a "confirmation", called the TGT ("Ticket-Granting Ticket"). You can find more information about kerberos from following links

[1] http://en.wikipedia.org/wiki/Kerberos_(protocol)
[2] http://web.mit.edu/kerberos/#what_is
[3] http://www.kerberos.info/


Environment:
Operating System: Ubuntu 10.04 Lucid Lynx 64 bit Edition
Kerberos : MIT Kerberos V5

MIT Kerberos, an implementation of Kerberos, will be used to authenticate users


Installation

Step 1: Install Key Distribution Center(KDC) and administration server 

sudo apt-get install krb5-{admin-server,kdc}

It will install master kdc and admin server , we can configure multiple slave kdc under a single master kdc. KDC installation will ask following questions
1. Default Kerberos version 5 realm?
We can gave any ASCII string as realm but conventionally use the upper case version of domain name 2. Kerberos4 compatibility mode to use? 
Give it as 'none'
3.What are the Kerberos servers for your realm?
Fully qualified domain name of kerberos server
4.What is the administrative server for your realm?
Fully qualified domain name of kerberos server 

Step 2:Create new realm use 'krb5_relam'


Use the command krb5_newrealm in the terminal

krb5_newrealm

The command will ask about the master password(don't forgot this) and create the realm using the name as define in the previous steps

Step 3:Restart Administrative server and key distribution center

sudo invoke-rc.d krb5-admin-server restart
sudo invoke-rc.d krb5-kdc restart

Step 4 :Initial Test

To just quickly test the installation, we will use the 'kadmin.local' database administration program. Start kadmin.local, then type 'listprincs'. That command should print out the list of principals. For example

sudo kadmin.local
Authenticating as principal root/admin@TEST.COM with password.

kadmin.local:  listprincs

K/M@TEST.COM
kadmin/admin@TEST.COM
kadmin/changepw@TEST.COM
kadmin/history@TEST.COM
krbtgt/TEST.COM@TEST.COM
kadmin.local: quit
'kadmin.local' work only in kerberos administration center\

Step 5:Access Rights

Edit /etc/krb5kdc/kadm5.acl file, and uncomment '*/admin *' line Enter into 'kadmin.local' and add policy for root user 'addprinc root/admin' For example

sudo kadmin.local
Authenticating as principal root/admin@TEST.COM with password.

kadmin.local:  addprinc root/admin

WARNING: no policy specified for root/admin@TEST.COM; defaulting to no policy
Enter password for principal "root/admin@TEST.COM": PASSWORD
Re-enter password for principal "root/admin@TEST.COM": PASSWORD
Principal "root/admin@TEST.COM" created.

kadmin.local:  quit
Restart Administrative server and key distribution center(Refer step 3) Test the new step using 'kadmin'. Kadmin as root/admin using
kadmin -p root/admin
If the configuration is correct, it will ask for password

Step 6: Obtaining a Kerberos Ticket 

Commands 
klist -5 -List the cached ticket 
kinit -to obtain ticket for current user 

Step 7:Installing Kerberized Services Kerberized service is need to authenticate with kerberos.
sudo apt-get install krb5-rsh-server 
sudo update-rc.d openbsd-inetd defaults
sudo invoke-rc.d openbsd-inetd restart
Step 8:Connecting to a Kerberos Server 

Install krb5-clients and krb5-user in each host, where we want to use kerberos authentication.
sudo apt-get install krb5-clients krb5-user
It will ask for kerberos administration and key distribution center details

References
[1] http://www.debian-administration.org/articles/570
[2] http://web.mit.edu/kerberos/krb5-1.8/krb5-1.8.1/doc/krb5-install.html
[3] http://techpubs.spinlocksolutions.com/dklar/kerberos.html