Wednesday, June 20, 2012

Remove AES Encryption From MIT Kerberos V5

AES encryption is used by default in MIT kerberos v5. But in Cloudera Distribution of Hadoop(CDH) does not support AES encryption.Here I am describing how to remove AES encryption from kerberos and change password of Ticket granting Ticket Principal.

Step 1: Removing AES encryption

Edit /etc/krb5kdc/kdc.conf file and remove aes256-cts:normal from ' 'supported_enctypes'

sudo vi /etc/krb5kdc/kdc.conf 
Step 2: Change password of Ticket granting Ticket Principal 

Use the following command in 'kadmin' utility

#kadmin -p root/admin
>change_password -randkey krbtgt/TEST.COM@TEST.COM
TEST.COM is your realm name.


Step 3: Restart kdc and admin server 
sudo invoke-rc.d krb5-kdc restart
sudo invoke-rc.d krb5-admin-server restart
Reference : http://web.mit.edu/kerberos/www/krb5-1.2/krb5-1.2.6/doc/admin.html

Monday, June 18, 2012

Installation and configuration of MIT Kerberos on Ubuntu

Kerberos is a central authentication protocol used to verify users, hosts and services using kerberos database. Kerberos database contains the entries called principals,which consists of principal names, secret keys, key aging information and Kerberos-specific data. User can access these principal from anywhere in the realm. Each realm contain one Key Distribution center and many slaves.User input is authenticated against the Kerberos database. In successful authentication, the KDC ("Key Distribution Center") will issue users a "confirmation", called the TGT ("Ticket-Granting Ticket"). You can find more information about kerberos from following links

[1] http://en.wikipedia.org/wiki/Kerberos_(protocol)
[2] http://web.mit.edu/kerberos/#what_is
[3] http://www.kerberos.info/


Environment:
Operating System: Ubuntu 10.04 Lucid Lynx 64 bit Edition
Kerberos : MIT Kerberos V5

MIT Kerberos, an implementation of Kerberos, will be used to authenticate users


Installation

Step 1: Install Key Distribution Center(KDC) and administration server 

sudo apt-get install krb5-{admin-server,kdc}

It will install master kdc and admin server , we can configure multiple slave kdc under a single master kdc. KDC installation will ask following questions
1. Default Kerberos version 5 realm?
We can gave any ASCII string as realm but conventionally use the upper case version of domain name 2. Kerberos4 compatibility mode to use? 
Give it as 'none'
3.What are the Kerberos servers for your realm?
Fully qualified domain name of kerberos server
4.What is the administrative server for your realm?
Fully qualified domain name of kerberos server 

Step 2:Create new realm use 'krb5_relam'


Use the command krb5_newrealm in the terminal

krb5_newrealm

The command will ask about the master password(don't forgot this) and create the realm using the name as define in the previous steps

Step 3:Restart Administrative server and key distribution center

sudo invoke-rc.d krb5-admin-server restart
sudo invoke-rc.d krb5-kdc restart

Step 4 :Initial Test

To just quickly test the installation, we will use the 'kadmin.local' database administration program. Start kadmin.local, then type 'listprincs'. That command should print out the list of principals. For example

sudo kadmin.local
Authenticating as principal root/admin@TEST.COM with password.

kadmin.local:  listprincs

K/M@TEST.COM
kadmin/admin@TEST.COM
kadmin/changepw@TEST.COM
kadmin/history@TEST.COM
krbtgt/TEST.COM@TEST.COM
kadmin.local: quit
'kadmin.local' work only in kerberos administration center\

Step 5:Access Rights

Edit /etc/krb5kdc/kadm5.acl file, and uncomment '*/admin *' line Enter into 'kadmin.local' and add policy for root user 'addprinc root/admin' For example

sudo kadmin.local
Authenticating as principal root/admin@TEST.COM with password.

kadmin.local:  addprinc root/admin

WARNING: no policy specified for root/admin@TEST.COM; defaulting to no policy
Enter password for principal "root/admin@TEST.COM": PASSWORD
Re-enter password for principal "root/admin@TEST.COM": PASSWORD
Principal "root/admin@TEST.COM" created.

kadmin.local:  quit
Restart Administrative server and key distribution center(Refer step 3) Test the new step using 'kadmin'. Kadmin as root/admin using
kadmin -p root/admin
If the configuration is correct, it will ask for password

Step 6: Obtaining a Kerberos Ticket 

Commands 
klist -5 -List the cached ticket 
kinit -to obtain ticket for current user 

Step 7:Installing Kerberized Services Kerberized service is need to authenticate with kerberos.
sudo apt-get install krb5-rsh-server 
sudo update-rc.d openbsd-inetd defaults
sudo invoke-rc.d openbsd-inetd restart
Step 8:Connecting to a Kerberos Server 

Install krb5-clients and krb5-user in each host, where we want to use kerberos authentication.
sudo apt-get install krb5-clients krb5-user
It will ask for kerberos administration and key distribution center details

References
[1] http://www.debian-administration.org/articles/570
[2] http://web.mit.edu/kerberos/krb5-1.8/krb5-1.8.1/doc/krb5-install.html
[3] http://techpubs.spinlocksolutions.com/dklar/kerberos.html

Thursday, May 10, 2012

SecurIT - the first ever international conference on Security of Internet of Things organized by Amrita Vishwa Vidyapeetham


If you have ever been concerned about using the internet and sharing details, you are not alone. Most of the common appliances in offices and households today are capable of being connected to the internet and indirectly monitoring your usage. While this offers larger flexibility, this convenience should not compromise your privacy. If you want to know all about this and how to manage threats and continue to live securely in the cyberworld, don’t miss out on this event. Amrita Vishwa Vidyapeetham is organizing the first ever international conference on Security of Internet of Things, SecurIT 2012, to be held at Amrita University campuses in Kochi and Amritapuri from 16 to 19 of August, 2012.

The SecurIT 2012, international conference will provide a leading-edge, cross-functional platform for researchers, academicians, professionals and industrial experts around the world to present and explore the latest advancements and  innovations in systems, applications, infrastructure, tools, test beds and foundation theories for the Security of Internet of Things. The three day conference will be hosted in the Amrita University campus in Amritapuri, in one of the most beautiful and picturesque locales of the Kerala coastal line.

The Internet of Things is a network of internet-enabled objects integrated via embedded devices, communicating with human beings as well as other devices as a distributed network. The conference focuses on the latest trends and  dvancements in the security aspect of internet of things. The conference will have academicians from universities and research labs and professionals from industry verticals such as security solution companies, automobile, mobile and wireless companies etc. to participate and contribute their original work and technical papers in key areas such as s security in cloud computing, mobile networks, cyber-physical control systems, healthcare systems, etc.

The conference uses a variety of formats to enable dialogue and participation ranging from technical presentations, demos, breakout sessions and hands-on workshops and tutorials on various key subjects of interest. As part of the conference events, an exciting student contest on ethical hacking called, sCTF (SecurIT Capture The Flag) is being conducted with attractive prizes and awards for the top-runners. Eligible students are offered free accommodation and travel grants to participate in the conference.

The conference is also conducting a contest 'PitchFest' a contest for start-ups with innovative ideas on internet of things. This contest is a perfect platform to present your innovative business ideas in the field of Internet of Things. The event is being held in cooperation with Cloud Security Alliance, and Trusted Computing Group. Pitchers can present their ideas in front of the elite panel of Pitchfest comprising Top level executives from our associate partners such as, Intel Capital, Cloud Security Alliance, Trusted Computing Group and www.edventure.com. The event will also give you an ample opportunity to network with many of the C level executives and CEOs from world famous companies across the globe.

The SecurIT 2012 conference will feature keynote and invited talks by world renowned speakers such as Robert Kahn, Co-Inventor of TCP/IP protocol, Esther Dyson, Entrepreneur & Philanthropist, Gulshan Rai, Director General, Cert-In, Pranav Mehta, CTO Embedded Systems, Intel Corporation,Yuliang Zheng, Professor, Department of Software and Information Systems University of North Carolina.

The conference is co-chaired by Dr. Ross Anderson, University of Cambridge and Dr. Greg Morrisett, Harvard University. The conference is steered by world-known technocrats and computer scientists such as Dr. Andrew Tanenbaum, VU, Amsterdam, Dr. Robert Kahn, Co-inventor of TCP/IP & CEO President, CNRI, Reston Virginia; Dr. Gulshan Rai,  Director General, Cert-In, Dr. John Mitchell, Professor, Stanford University & ACM Fellow, Dr. Gene Tsudik, Editor-Chief of ACM
Transactions on Information and System Security & Professor, U.C. Irvine, Dr. Prasant Mahopatra, IEEE Fellow & Professor, U. C. Davis; Dr. Sree Rajan, Director, Fujitsu Laboratories of America, Dr. Masahiro Fujita, Professor, University of Tokyo, Dr. Venkat Rangan, Amrita University.

For more information, please visit our website, http://www.securit.ws/

Sunday, February 26, 2012

Multi-Node Hadoop Cluster On Ubuntu Linux

In my previous post,Hadoop 1.0.0 single node configuration on ubuntu deals with hadoop 1.0.0 version, but it is very difficult to configure multi-node setup on ubuntu with hadoop 1.0.0 in the same way. Therefore here I used the following configuration

OS:ubuntu 10.04
Hadoop version: 0.22.0

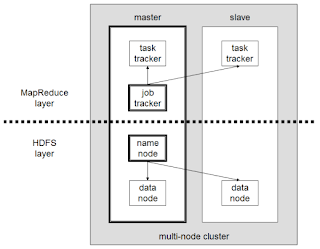
A small Hadoop cluster will include a single master and multiple worker nodes. But here I am using two machines, one for master and other for slave. The master node consists of a JobTracker, TaskTracker, NameNode, and DataNode.A slave acts as both a DataNode and TaskTracker.

I assigned the IP address 192.168.0.1 to the master machine and 192.168.0.2 to the slave machine.


Step 1: Install oracle jdk

Follow this step on both master and slave.

Add the repository to your apt-get:
$sudo apt-get install python-software-properties
$sudo add-apt-repository ppa:sun-java-community-team/sun-java6

Update the source list
$sudo apt-get update
Install sun-java6-jdk
$ sudo apt-get install sun-java6-jdk
Select Sun’s Java as the default on your machine.
$ sudo update-java-alternatives -s java-6-sun
After the installation check the java version using
hadooptest@hadooptest-VM$java -version
java version "1.6.0_20"
Java(TM) SE Runtime Environment (build 1.6.0_20-b02)
Java HotSpot(TM) Client VM (build 16.3-b01, mixed mode, sharing)
Part 2: Configure the networkYou must change the /etc/hosts file with the details of the master and slave IP. Open /etc/hosts file in both master and slave using.
$sudo vi /etc/hosts
And add the following lines
192.168.0.1     master
192.168.0.2     slave
Part 3: Create hadoop user

In this step, we will create a new user and group in master and slave to run the hadoop. Here I added user 'hduser' with in the group 'hd' using following commands.
$sudo addgroup hd
$sudo adduser --ingroup hd hduser
Part 4: SSH Setup

Install ssh on master and slave using
$sudo apt-get install ssh
Let’s configure password less shh between master and slave.
$ su - hduser
$ssh-keygen -t rsa -P ""
$cat ~/.ssh/id_rsa.pub >> ~/.ssh/authorized_keys

On the Master machine run the following
$hduser@master:~$ ssh-copy-id -i $HOME/.ssh/id_rsa.pub hduser@slave
Test the ssh configuration on master :
$ ssh master
$ ssh slave
If the ssh configuration is correct. the above command does nor ask for password.

Part 5: Configuring Hadoop

(Run this step on master and slave as normal user)
Download the latest hadoop 0.22 from: http://www.reverse.net/pub/apache//hadoop/common/ and extract it using :
Hadoop: tar -xvf hadoop*.tar.gz
Move hadoop folder from downloaded folder to /usr/local
$sudo mv /home/user/Download/hadoop /usr/local/
Change the ownership of the hadoop directory
$sudo chown -R hduser:hd /usr/local/hadoop
Configure /home/hduser/.bashrc with the Hadoop variables enter the following commands:
$ sudo vi /home/hduser/.bashrc
Add the following lines to the end
export JAVA_HOME=/usr/lib/jvm/java-6-sun
export HADOOP_HOME=/usr/local/hadoop
export PATH=$PATH:$HADOOP_HOME/bin
Create a folder which Hadoop will use to store its data file
$sudo mkdir -p /app/hadoop/tmp
$sudo chown hduser:hd /app/hadoop/tmp
Open the core-site.xml file in hadoop configuration directiory(/usr/local/hadoop/conf)
$sudo vi /usr/local/hadoop/conf/core-site.xml

Add the following property tags between and tag in core-site.xml:
<property>  
      <name>hadoop.tmp.dir</name>
      <value>/app/hadoop/tmp</value>
      <description>Temporary directories.</description>
</property>

<property>  
       <name>fs.default.name</name>
       <value>hdfs://master:54310</value>
       <description>Default file system.</description>
</property>
Open the mapred-site.xml file in hadoop configuration directory
$sudo vi /usr/local/hadoop/conf/mapred-site.xml

Add the following property tags to mapred-site.xml:
<property> 
       <name>mapred.job.tracker</name>
       <value>master:54311</value>
       <description>MapReduce job tracker.</description>
</property>
Open the hdfs-site.xml file in hadoop configuration directory
$sudo vi /usr/local/hadoop/conf/hdfs-site.xml

Add the following property tags to hdfs-site.xml:
<property>
       <name>dfs.replication</name>
       <value>2</value>
       <description>Default block replication.
        The actual number of replications can be specified when the file is created.
         The default is used if replication is not specified in create time.
       </description>
</property>
Open the hadoop-env.sh file in hadoop configuration directory
$sudo vi /usr/local/hadoop/conf/hadoop-env.sh

Add uncomment the following line with proper java path
export JAVA_HOME=/usr/lib/jvm/java-6-sun


Part 6: Configure Master Slave Settings
Edit the following files on both the master and slave machines.
    conf/masters
    conf/slaves

On Master machine:

Open the following file: conf/masters and change ‘localhost’ to ‘master’:
master

Open the following file: conf/slaves and change ‘localhost’ to
master
slave

On the Slave machine:

Open the following file: conf/masters and change ‘locahost’ to ‘slave’:
slave

Open the following file: conf/slaves and change ‘localhost’ to ‘slave’
slave

Part 7 : Starting Hadoop
To format hdaoop datanode, run the following on master in hadoop/bin(/usr/local/hadoop/bin):
$ hadoop namenode -format

Start HDFS daemons, run the following command in hadoop/bin:
$./start-dfs.sh

Run jps command on master, got output like this
14399 NameNode
16244 DataNode
16312 SecondaryNameNode
12215 Jps

Run jps command on slave,got output like this
11501 DataNode
11612 Jps

To Start Map Reduce daemons, run the following command in hadoop/bin
$./start-mapred.sh

Run jps command on master
14399 NameNode
16244 DataNode
16312 SecondaryNameNode
18215 Jps
17102 JobTracker
17211 TaskTracker

Run jps command on slave
11501 DataNode
11712 Jps
11695 TaskTracker

Part 8:Example MapReduce job using word count
Download Plain Text UTF-8 encoding file for following books and store into a local directory (here using /home/hadoopmaster/gutenberg)

Download mapreduce programme jar(hadoop-examples-0.20.203.0.jar) file to any local folder (here using /home/hadoopmaster).
To run mapreduce programe, we need to copy these files into HDFS directory from local directory. For this purpose, first login to the hadoop user and move hadoop directory
$su hduser
$cd /usr/local/hadoop/
Copy local file to HDFS using
$hadoop dfs -copyFromLocal /home/hadoopmaster/gutenberg /user/hduser/gutenberg
Check the content inside HDFS directory using
$hadoop dfs -ls /user/hduser/gutenberg

Move to folder that containing downloaded jar file.
Run the following command to execute the programme
$hadoop jar /home/hadoop-master/hadoop-examples-0.20.203.0.jar wordcount 
/user/hduser/gutenberg /user/hduser/gutenberg-out

Here /user/hduser/gutenberg is the input directory and /user/hduser/gutenberg-out is the output directory. Both input and output directory must be in HDFS file system. The jar file should be in local file system
It will take some time according to your system configuration. You can track the job progress using hadoop tracker websites
JobTracker website: http://master:50030/
NameNode website : http://master:50070/
Task track website: http://master:50060/
Check the result of the programme using
$hadoop dfs -cat /user/hduser/gutenberg-output/part-r-00000

Friday, January 27, 2012

Hadoop 1.0.0 single node configuration on ubuntu

Hadoop is a framework for distributed processing across multiple compute clusters. It provides reliable data storage using Hadoop Distributed File System(HDFS) and high performance parallel data processing using MapReduce method. You can find more information from following
http://wiki.apache.org/hadoop/
Here I am describing my own experience with hadoop 1.0.0 configuration in a ubuntu box. I am using ubuntu 11.04 for this configuration.

Step 1: Download and install oracle jdk

Install jdk 1.6 or above using following step
Add the repository to your apt-get:
hadooptest@hadooptest-VM$sudo apt-get install python-software-properties
hadooptest@hadooptest-VM$ sudo add-apt-repository ppa:sun-java-community-team/sun-java6

Update the source list
hadooptest@hadooptest-VM$ sudo apt-get update

Install sun-java6-jdk
hadooptest@hadooptest-VM$ sudo apt-get install sun-java6-jdk

Select Sun’s Java as the default on your machine.
hadooptest@hadooptest-VM$ sudo update-java-alternatives -s java-6-sun

After the installation check the java version using
hadooptest@hadooptest-VM$java -version
java version "1.6.0_20"
Java(TM) SE Runtime Environment (build 1.6.0_20-b02)
Java HotSpot(TM) Client VM (build 16.3-b01, mixed mode, sharing)
Step 2:Download and Install Hadoop

Download i386 or amd64 version(according to your os version) of .deb package from http://ftp.jaist.ac.jp/pub/apache/hadoop/common/hadoop-1.0.0/. Install the hadoop by double clicking the file or using dpkg command.

hadooptest@hadooptest-VM$sudo dpkg -i  hadoop_1.0.0-1_i386.deb
Step 3: Set up Hadoop for single node

Setup hadoop for single node using following command
hadooptest@hadooptest-VM$sudo hadoop-setup-single-node.sh
Answer "yes" for all questions. Service will automatically started after the installation.

Step 4: Test hadoop configuration
hadooptest@hadooptest-VM$ sudo hadoop-validate-setup.sh --user=hdfs
If you get "teragen, terasort, teravalidate passed." near the end of the output, everything is ok.

Hadoop Tracker websites

JobTracker website: http://localhost:50030/
NameNode website : http://localhost:50070/
Task track website: http://localhost:50060/

Step 5: Example MapReduce job using word count

5.1 Download Plain Text UTF-8 encoding file for following books and store into a local directory (here using /home/hadooptest/gutenberg)
5.2 Download mapreduce programme jar(hadoop-examples-0.20.203.0.jar) file to any local folder (here using /home/hadooptest)
5.3. To run mapreduce programe, we need to copy these files into HDFS directory from local directory. For this purpose, first login to the hadoop user using
hadooptest@hadooptest-VM$su hdfs
Copy local file to HDFS using
hdfs@hadooptest-VM$hadoop dfs -copyFromLocal /home/hadooptest/gutenberg /user/hdfs/gutenberg
Check the content inside HDFS directory using
hdfs@hadooptest-VM$hadoop dfs -ls /user/hdfs/gutenberg
5.4. Move to folder that containing downloaded jar file.
5.5. Run the following command to execute the programme
hdfs@hadooptest-VM:/home/hadooptest$hadoop jar /user/hdfs/hadoop-examples-0.20.203.0.jar wordcount /user/hdfs/gutenberg /user/hdfs/gutenberg-out
Here /user/hdfs/gutenberg is the input directory and /user/hdfs/gutenberg-out is the output directory. Both input and output directory must be in HDFS file system.
It will take some time according to your system configuration. You can track the job progress using hadoop tracker websites

5.6. Check the result of the programme using
hdfs@hadooptest-VM:/home/hadooptest$hadoop dfs -cat /user/hduser/gutenberg-output/part-r-00000